


Chevron wall art is IN! Are you frustrated when you see your monotonous and lifeless walls every day? Fret no more because here’s an easy yet stunning decor perfect for those surfaces. Learn how to make a chevron wall art in this article.
DIY Chevron Wall Art | How to Creatively Brighten Up Your Walls
Pretty Wall Decor for a Happier, Livelier Ambiance
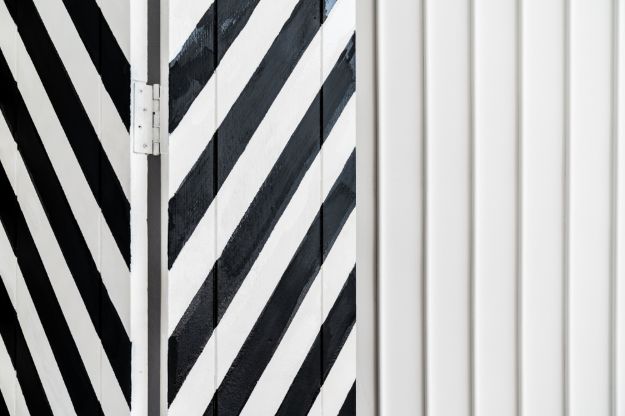
If you wish to glam up your boring living room and bedroom with little details, Chevron wall art decors might suit your preference. This stylish-looking piece will give that extra wow factor to your lonely home walls.
The toughest part in mastering the Chevron wall art techniques is getting your measurements right. With proper estimation and analysis, you’ll surely nail it!
For this project, you’ll need:
- 2 different colors of paint
- paint brushes
- ruler
- pencil
- painter’s tape
- canvas
- small knife
If you’re ready for this craft, let’s get started!
Instructions:
Step 1: Apply the Base Coat
Start off by covering your canvas fully with a base coat. Once your base coat dries up, decide on how wide the peaks of your chevron pattern would be.
Step 2: ‘X’ Marks
Using your ruler and pencil, put an ‘x’ mark on the upper left corner of your canvas. From there, measure four inches going to the right and mark it with another ‘x’ mark. Continue doing this until you reach the right end of the canvas. Going back to your first ‘x’ mark on the upper left corner, measure four inches going down and marked it as well. From here, measure four inches going to the right. This will be your second row.
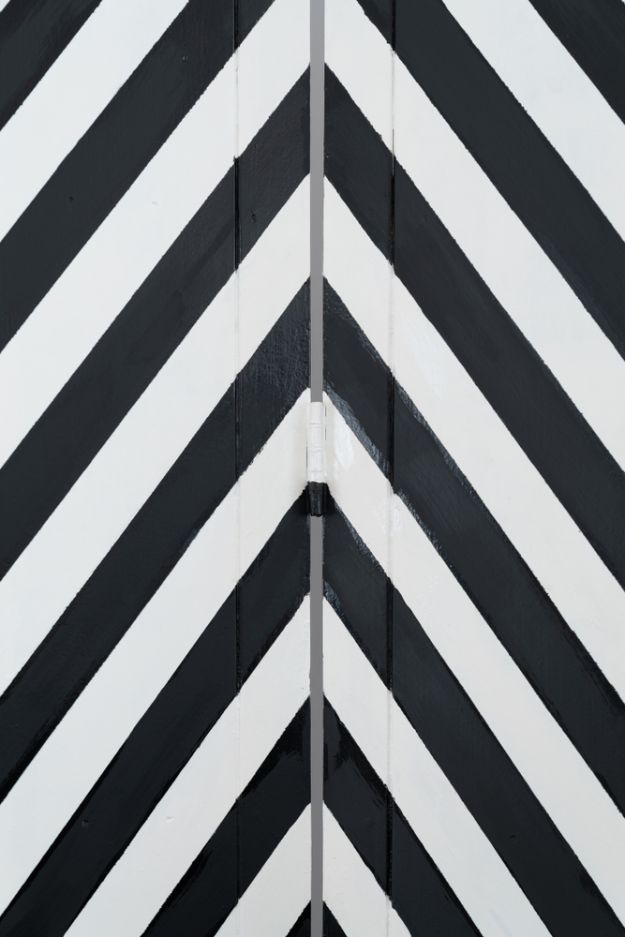
Repeat the same pattern and measurement until your canvas is full. When you’re done, your canvas should look like this:
Step 3: ‘O’ Marks
Starting on the second row, measure two inches from the first ‘x’ mark and put an ‘o’ mark. Repeat this pattern for the rest of the rows. When you’re done, your canvas will have ‘x’ and ‘o’ in every two inches and it will appear like this:
Step 4: Connect the Marks
Starting from the first ‘o’ mark on the second row, we’re going to connect it with the two ‘x’ marks on the first row using a painter’s tape. This will create a V-like shape on your canvas. Repeat it with the rest of the marks. Smoothen out the tape so the paint will not get underneath.
Tip: To make a perfect V, cut off the excess tape on top using a knife.
Step 5: Seal it in!
Once you have everything taped, take your brush and use the same paint you used as your base coat to seal everything on and prevent bleeding.
Step 6: Apply the 2nd Paint
Once the coat is dry, start making your chevron stripe using your other paint. Feel free to paint over your painter tape BUT don’t cover it up completely.
Step 7: Remove the Painter’s Tape
Once your second paint is completely dry,carefully remove the painter’s tape at a 90-degree angle. When you’re done removing the tape and you see some stray pencil lines, just erase them carefully using an eraser.
And You’re Done!
Ta-daah! Say hello to the newest sunshine of your walls!
For the full video of this project, check this out:

For a bigger canvas, you can also do this technique straight to your walls. Just remember that if you measure shorter lengths, you’ll have more peaks. Let your artistic heart come out and just enjoy brightening up your home.
For more DIY tutorials, click here.