


Is there a discarded mason jar lying around your house? Then put them to good use by decorating and transforming them into a chic home decoration. Check out this tutorial by CuteSimpleStuff and learn how to make one.
DIY Shabby Chic Striped Mason Jar That Will Add a Classy Touch to Your Room
Transform a Simple Mason Jar into Something Fancy!
There are always a few unused mason jars lying around the house. It can be an empty jar of jam or spread. Instead of neglecting and storing them away, put them to good use. Transform them into a piece of home decor. If you are interested, here’s how:
You’ll need:
- Mason Jar
- White Acrylic Paint
- Black Acrylic Paint
- Mint Green Acrylic Paint
- Paint Brush or Round Sponge
- Painter’s Tape
- Nail Buffer
- Krylon Clear Polyurethane
Step 1: Cover with White Paint
Grab your round sponge or paint brush and cover the mason jar with white acrylic paint. Coat it twice or more until the transparency of the glass can’t be noticed anymore. Leave it to dry.
Step 2: Put the Tape
When you are certain that the paint is absolutely dry, wrap the painters tape around the mason jar. Arrange it in equal spaces parallel with each other. The painter’s tape should resemble a stripe pattern.
Step 3: Apply Black Paint
Apply black acrylic tape to the gaps of the tape. After applying black paint to one section, remove the tape while the paint is not dry yet. If you wait for the paint to dry up, chances are when you remove the tape, some of the paint will come off.
Step 4: Clean the Edges
Using a paint brush, clean the edges where black paint was smudged. After smoothing the edges, leave the paint to dry.
Step 5: Buff
With the use of a nail buffer, buff some of the edges and corners of the jar. This will give your jar a vintage or shabby look.
Step 6: Paint the Jar Cover
Put a hole in the center of the cover. Paint it with the mint green acrylic paint. After the paint is dry, buff the corners of the cover to give it a vintage look like the jar.
Step 7: Spray Gloss Finish
Spray some Krylon Clear Polyurethane for the finishing touches. This will protect and provide the gloss for your mason jar.
Watch the full video tutorial by CuteSimpleStuff below:
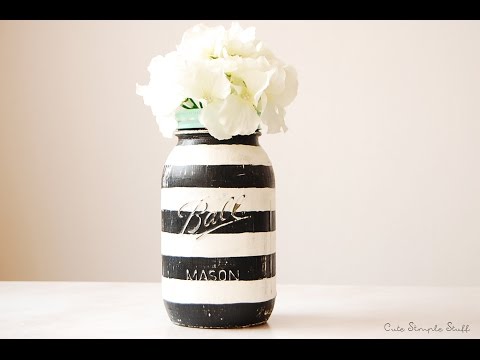
This looks awesome, right? You can now put anything inside this revamped mason jar. Use it as a flower vase or pen and pencil holder. This is indeed a creative way of reusing those mason jars!
For more DIY projects, click here.
Like this post? You’ll also like…
DIY Candle | Watermelon Scented Candles That Will Brighten Up Your Home
Home Decor | DIY Starburst Mirror That Will Make Your Wall Look Magical
DIY Bookshelf Every Bookworm Should Have