


Do you want to learn how to create a perfect winged eyeliner? The ever popular winged eyeliner is a fun addition to every makeup look, but can be intimidating for some! Never fear. We are here to help walk you through the process! From Kardashian to Catwalk, this timeless look is bound to turn heads.
Perfect Winged Eyeliner Tutorial
Supplies for perfect winged eyeliner:
- Thin Liner Brush
- Cake Eyeliner
- Q-Tips
- Makeup Remover
- Mascara
- Scotch Tape
- Water
- Foundation
- Flat Concealer Brush
Step 1: Creating a guide
The most difficult part about winged eyeliner is creating symmetry, and knowing where to place your wing. A simple way to minimize your guesswork and make painting your wings a breeze is to use tape! You heard me right. Rip two pieces of clear tape, about 2 inches each. Where you place your tape will determine the shape of the wing, so my suggested position is to place the tape directly near your lashes in the corner of your eye, and angle the tape toward the top of your ear. If the tape is angled too sharply, it will stop the eye short and create the illusion of a smaller eye.
Step 2: Dip and dab
We have found the easiest type of liquid eyeliner to control is ‘cake’ eyeliner. Cake eyeliner is a dry eyeliner that is activated with a small amount of water on your brush. Cake eyeliner offers a jet black matte line that is not only easiest to control, but drys quickly and stays on for hours without chipping or smearing. Taking a thin liner brush, dip it in water and work into the cake liner. Test the consistency on the back of your hand until you find what works best for you.
Step 3: Proceed with caution!
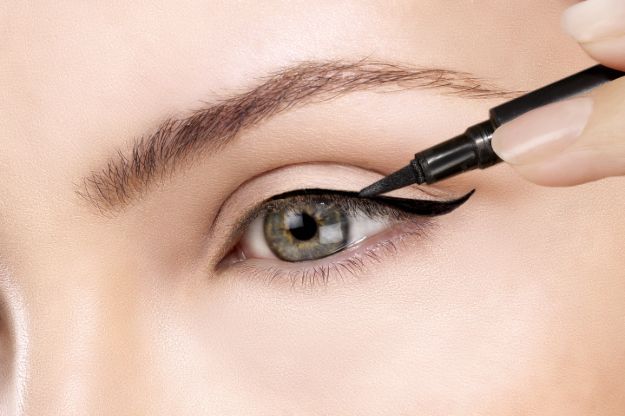
Now, using the side of the brush instead of the tip, start from the middle of the lid and trace a straight line to the edge of the tape.
Step 4: Don’t neglect the corner
Fill in the corner next to the lashes by painting on the liner. In this step it is important the tape is secure to the skin, otherwise it will leak underneath the tape and the lines will no longer be crisp.
Step 5: Think thin!
While the brush has little product left on it, start the liner where your lashes begin near the inner corner of your eye. Think of creating the line thin to thick. Don’t worry if the line is a tad shaky at first, it is an easy fix and you will get better with practice.

Step 6: Time to clean up
After you have lined both sides, remove the tape. If you have any smudges you need to correct, dip your q-tip into the makeup remover. Before putting it directly to the liner, first blot it with a tissue. Often time too much remover will be wicked up into the q-tip, and create a mess. Trace the q-tip over any edges you need to repair, paying attention to the symmetry of each eye. When finished, use the dry end to dry the area.
Congratulations on creating a perfect winged eyeliner! Easier than you thought right? Try adding this look to any of your favorite eye shadows for extra pizazz. For the wild child in all of us, try in all your favorite colors, and be sure to send us pictures of your results!

Don’t miss all of our latest and greatest makeup tips right here on YSP. Did we miss something important? Make sure to leave your comments in the comments section below! Your feedback is really important to us. The more tutorials you suggest, the more likely we are to do posts like that in the future. Check out all of our DIY makeup tutorials, beauty hacks, hair tips, wedding ideas, and so much more! At You’re So Pretty we pride ourselves on delivering you the most groundbreaking beauty products and videos on the market! Check us out on Facebook and Pinterest! Thanks and we’ll be seeing you again!