


What day is it today? It’s World Ocean’s Day! Join the celebration and the cause by painting your nails with this sea-inspired nail art design. Find out how by reading this tutorial from SaraBeautyCorner – DIY, Comedy, Makeup, Nail Art.
Cool Sea-Inspired Nail Art Design to Celebrate World Ocean’s Day
For the Love of Starfish, Blue Ocean, and Summer!
World Ocean’s Day is a special day for ocean celebration that emphasizes its major role towards a better future. For this year, the theme is ” Healthy Oceans, Healthy Planet” . It is focused on taking action on the pollution in our ocean that mainly consists of plastics. Show your support for the cause by painting your nails the healthy color of the sea and all it stands for.
You’ll need:
Nail Polish:
- Base Coat Nail Polish
- White Nail Polish
- Turquoise Nail Polish
- Baby Blue Nail Polish
- Purple Nail Polish
- Red Nail Polish
- Silver Nail Polish
- Glitter Nail polish
- Top Coat Nail Polish
Tools:
- Cosmetic Sponge
- Q-Tip
- Acetone
- Stripping Brush
- Dotting Tool
Instructions:
Step 1: Apply Base Coat

Apply base coat. This step is important to prevent damage on your nails because of the products you’re applying. Leave the base coat to dry.
Step 2: For the Pinkie and Pointer Finger

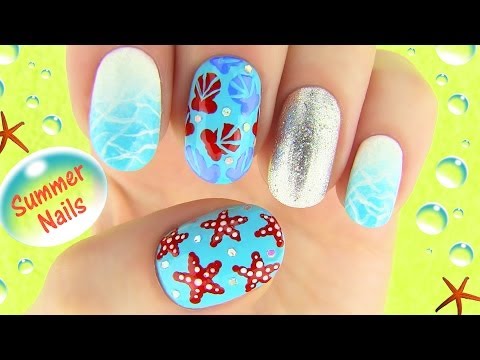
Apply the white nail polish to your pinkie finger.
Layer turquoise blue, baby blue and white nail polish on the cosmetic sponge. This will provide the gradient for the ocean effect. Dab the sponge on your nail. Clean around the edges by using a q-tip dipped in acetone.
With the use of the stripping brush and white nail polish, add more effect to the ocean-look by drawing the wavy lines. AWhen you’re done, apply top coat for protection. Repeat the process on your pointer finger.
Step 3: For the Middle Finger
Start with turquoise nail polish as base. With the use of the dotting tool, draw seashells on the surface of your nails. You can choose your own colors fro the shells. We used red and purple nail polish in this tutorial.
To make your nails prettier, draw 3-4 thin stripes within the shells. You can use the stripping brush and the turquoise nail polish. Looks good, right?
Select a few larger glitter dots from your glitter nail polish and put them in the empty spaces between the seashells. Apply top coat to seal the design.
Step 4: For the Ring Finger

For the accent nail, apply two coats of silver nail polish. Add more dimension by applying the glitter polish. Again, apply top coat.
Step 5: For the Thumb
Apply the turquoise nail polish for the base. With a dotting tool and red nail polish, make a dot at the center of the starfish and five dots around the center dot. Connect the dots with the dotting tool to have a perfect star.
For the final touch, apply white dots from the center towards its five arms. Then, place some larger glitter dots on the empty spaces. Apply top coat.
You now have a sea-inspired nail art design!
Watch the full video tutorial below:
We’re loving this cool and cute nail art design! You can now celebrate World Ocean’s Day with this awesome nail art. Express your support for this very important event and help protect the ocean so that everyone will see its real beauty — not just on your fingers.